Resizing passport photos is an essential skill for anyone applying for official documents, visas, or identification cards. The process may seem complicated at first, but with the right tools and a systematic approach, you can resize passport photo correctly and efficiently. This guide will walk you through every step to ensure your passport photo meets the required standards.
Understanding Passport Photo Requirements
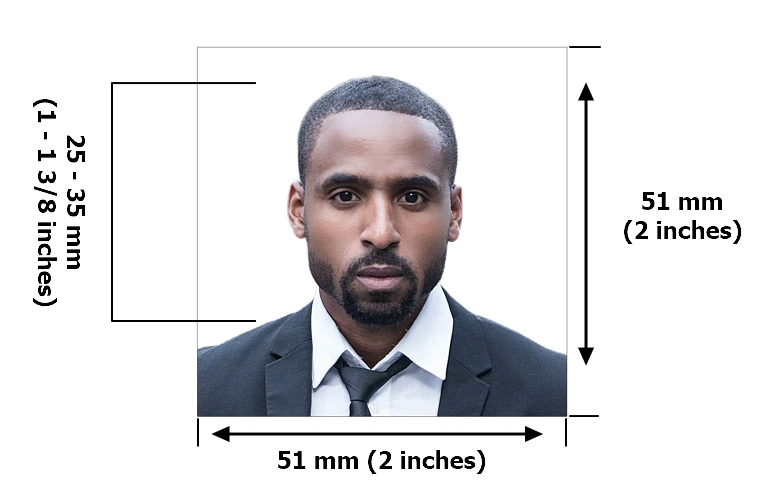
Before you attempt to resize passport photo, it’s crucial to understand the standard requirements. Most countries have specific dimensions, background colors, and face positioning rules. For example, in many countries, the standard passport photo size is 35×45 mm, with a clear, light-colored background and the subject facing the camera directly. Knowing these specifications is the first step in avoiding rejection of your application.
The dimensions and other specifications vary depending on the type of application. Always check the official guidelines from the relevant authority before resizing passport photo to avoid mistakes. Incorrect sizes, blurred images, or poor lighting can lead to delays or rejection of your application.
Choosing the Right Tool to Resize Passport Photo
There are various tools available to resize passport photo, ranging from online photo editors to desktop software. Some popular options include Photoshop, GIMP, Microsoft Paint, and online services specifically designed for passport photos.
Online tools are convenient because they often come with preset templates for different countries’ passport photo requirements. Desktop software gives you more control over editing, including adjusting brightness, contrast, and cropping precisely. Select the tool that suits your comfort level and technical ability.
Preparing Your Photo
Before resizing passport photo, make sure the original image meets basic quality standards. The photo should be recent, in color, and free of shadows or reflections. Avoid filters or heavy editing, as this can affect the acceptance of your passport photo.
Position yourself against a plain background and ensure your face is fully visible. Remove glasses, hats, or other accessories unless medically necessary. Once the photo is taken, transfer it to your computer or device where you will perform the resizing.
Step 1: Open Your Image in the Editing Tool
The first step in resizing passport photo is to open your image in the selected editing tool. This step may differ slightly depending on the software. In Photoshop, for example, you would open the image and select the crop tool. In online editors, you usually upload the photo to the website interface.
Ensure that the photo resolution is high enough to maintain quality after resizing. Low-resolution images may appear pixelated once they are adjusted to passport dimensions. A minimum of 300 dpi is recommended for most official documents.
Step 2: Set the Correct Dimensions
Once your image is open, set the dimensions according to the official passport photo requirements. For example, many countries require photos to be 35×45 mm. In your editing tool, locate the option to set image size or crop dimensions.
Input the width and height carefully to ensure accuracy. Some tools allow you to choose units such as millimeters, inches, or pixels. Make sure to select millimeters if you want precise control over the passport photo size. Lock the aspect ratio to avoid distortion of your face.
Step 3: Crop the Photo Properly
Cropping is an important step when you resize passport photo. Ensure your head and shoulders are visible, and your face is centered in the frame. Most passport guidelines specify that the head should occupy about 70-80% of the photo height.
Use the grid or guidelines provided by your editing tool to align your face correctly. Avoid cropping too closely, which may cut off parts of the hair or chin, as this can lead to rejection.
Step 4: Adjust Brightness and Contrast
After cropping, check the brightness and contrast of the image. A passport photo should clearly show your facial features without shadows or overexposed areas. Many editing tools allow you to adjust brightness, contrast, and color balance.
Avoid extreme edits that change your natural appearance. Subtle adjustments can enhance visibility and ensure the photo meets official standards. A clear, well-lit photo increases the likelihood of your passport application being accepted on the first attempt.
Step 5: Save the Photo in the Correct Format
Once you have resized passport photo and made necessary adjustments, save the image in the required file format. Common formats include JPEG or PNG. Make sure the resolution remains at least 300 dpi to maintain quality.
Check the file size limits specified by the passport authority. Some countries have strict requirements regarding the maximum file size for digital submissions. Renaming the file appropriately can also help prevent confusion during submission.
Step 6: Verify the Photo
Before submitting your resized passport photo, verify that it meets all official specifications. Compare it with the official sample photos provided by the issuing authority. Ensure dimensions, head position, background, and facial visibility are correct.
Many online tools provide a verification feature to check whether your resized passport photo meets the required criteria. This extra step can save time and prevent your application from being rejected.
Step 7: Printing the Passport Photo
If you need a physical copy, print the resized passport photo on high-quality photo paper. Use a printer capable of producing sharp images and accurate colors. Avoid standard paper or low-resolution prints, as they may not be accepted.
Make sure to cut the photo to the exact dimensions using a ruler and a sharp blade. Rounded corners or uneven edges can sometimes lead to rejection, so precision is key when preparing a printed version.
Tips for Resizing Passport Photos Efficiently
- Always keep the original photo untouched; work on a copy to avoid mistakes.
- Use templates provided by online tools for different countries to speed up the resizing process.
- Double-check the official guidelines before saving and printing the photo.
- Avoid using smartphone filters or edits that alter your natural appearance.
- Ensure consistent lighting and background to avoid shadows and reflections.
Common Mistakes to Avoid
Many people make errors when resizing passport photo, which can lead to delays in their applications. Common mistakes include:
- Cropping too much or too little
- Using low-resolution images
- Ignoring background color requirements
- Over-editing the photo
- Not verifying the final dimensions
Avoiding these mistakes will make the process smoother and ensure your photo is accepted without issues.
Conclusion
Resizing passport photo may seem challenging, but following a structured approach simplifies the task significantly. By understanding official requirements, using the right tools, cropping and adjusting the image carefully, and verifying the final product, you can produce a high-quality passport photo that meets all standards. Whether you need a digital submission or a printed copy, this step-by-step guide ensures your passport photo is ready for any application, saving you time and potential frustration.
With practice, resizing passport photo becomes a quick and efficient task, giving you confidence that your application will meet official requirements every time.